Text Data 전처리 프로세스
- 클렌징(cleansing)
- 특수문자, 기호 필요없는 문자 제거
- 대소문자 변경=>모두 소문자로 변환
- stop word(분석에 필요 없는 토큰) 제거
- 텍스트 토큰화
- 분석의 최소단위로 나누는 작업
- 보통 단어단위나 글자단위로 나눈다.
- 어근 추출(Stemming/Lemmatization)을 통한 텍스트 정규화 작업
- tokenize_text에 stemming=>Lemmatization 추가
전처리 Process Python Code 예시
text_sample = """Beautiful is better than ugly.
Explicit is better than implicit.
Simple is better than complex.
Complex is better than complicated.
Flat is better than nested.
Sparse is better than dense.
Readability counts.
Special cases aren't special enough to break the rules.
Although practicality beats purity.
Errors should never pass silently.
Unless explicitly silenced.
In the face of ambiguity, refuse the temptation to guess.
There should be one-- and preferably only one --obvious way to do it.
Although that way may not be obvious at first unless you're Dutch.
Now is better than never.
Although never is often better than *right* now.
If the implementation is hard to explain, it's a bad idea.
If the implementation is easy to explain, it may be a good idea.
Namespaces are one honking great idea -- let's do more of those!"""
import nltk
from nltk.corpus import stopwords
from nltk.tag import pos_tag
from nltk.stem import WordNetLemmatizer
def get_wordnet_pos(pos_tag):
"""
펜 트리뱅크 품사표기법(pos_tag()의 반환형태)을 받아서 WordNetLemmatizer에서 사용하는 품사표기(v, a, n, r)로 변환하는 함수.
[매개변수]
pos_tag: pos_tag()가 반환하는 품사
[반환값]
문자열: 동사-"v", 명사-'n', 형용사-'a', 부사-'r', 그외-None
"""
if pos_tag.startswith('V'):
return 'v'
elif pos_tag.startswith('N'):
return 'n'
elif pos_tag.startswith('J'):
return 'a'
elif pos_tag.startswith('R'):
return 'r'
else:
return None
def tokenize_text2(text):
"""텍스트 전처리 함수"""
# 소문자로 모두 변환
text = text.lower()
# 문장 단위로 토큰화
sentence_tokens = nltk.sent_tokenize(text) #[문장, 문장, 문장]
#stopwords 조회
stop_words = stopwords.words('english')
stop_words.extend(['although','unless', 'may'])
#원형복원을 위해 객체생성
lemm = WordNetLemmatizer()
# 반환한 값들을 모아놓을 리스트
word_token_list = []
# 문장단위로 처리
for sentence in sentence_tokens:
# word 토큰 생성
word_tokens = nltk.regexp_tokenize(sentence, r'[A-Za-z]+')
# 불용어(stopword)들 제거
word_tokens = [word for word in word_tokens if word not in stop_words]
#Stemming
# stemmer = SnowballStemmer('english')
# word_tokens = [stemmer.stem(word) for word in word_tokens]
# 원형 복원
# 1. 품사부착
word_tokens = pos_tag(word_tokens)
# 2. lemmatize()용 품사로 변환
word_tokens = [(word, get_wordnet_pos(tag)) for word, tag in word_tokens if get_wordnet_pos(tag)!=None]
# 3. 원형복원
word_tokens = [ lemm.lemmatize(word, pos=tag) for word, tag in word_tokens]
word_token_list.append(word_tokens)
return word_token_list
Text 분석을 위한 클래스
- Text 분석을 위한 클래스 예시는 아래 뉴스 데이터를 활용합니다
with open('news.txt', encoding='UTF-8') as f:
    news_text = f.read()

Text Class
- 문서 분석에 유용한 여러 메소드 제공
- 토큰 리스트을 입력해 객체생성 후 제공되는 메소드를 이용해 분석한다.
- 생성
- Text(토큰리스트, [name=이름])
- 주요 메소드
- count(단어)
- 매개변수로 전달한 단어의 빈도수
- plot(N)
- 빈도수 상위 N개 단어를 선그래프로 시각화
- dispersion_plot(단어리스트)
- 매개변수로 전달한 단어들이 전체 말뭉치의 어느 부분에 나오는지 시각화
- count(단어)
Text Class 사용 예시
# news_tokens을 1차원 리스트로 변환
news_words = []
for lst in news_tokens:
    news_words = news_words+lst


from nltk import Text

#Text객체 생성 - Text객체가 하나의 문서(document)를 분석한다. (document-하나의 주제에대한 text)
news_text = Text(news_words, name='뉴스')
news_text

# tokens 속성 - Text 내의 모든 토큰들을 반환
news_text.tokens

# count(토큰): 전달한 토큰이 몇개가 있는지 빈도수를 반환
news_text.count('london'), news_text.count('game'), news_text.count('son')
#==> (6, 5, 45)
import matplotlib.pyplot as plt
plt.figure(figsize=(10,7))
news_text.plot(10) # 10 - 빈도수 상위 10개 단어를 선그래프로 그려준다. X축-단어, Y축-개수(빈도수)
plt.show()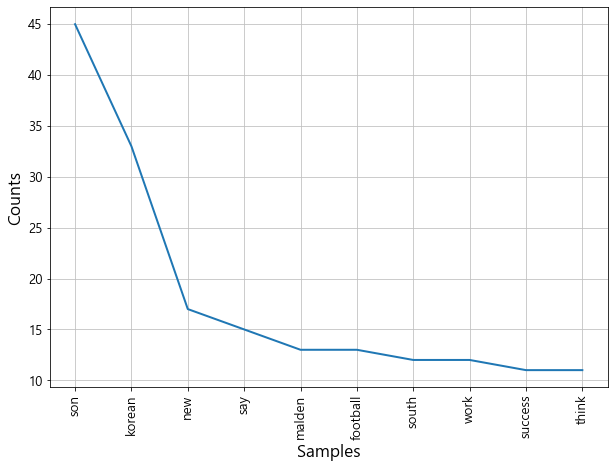
plt.figure(figsize=(10,7))

lst = ['son', 'korean','new', 'football']
news_text.dispersion_plot(lst) # 전체 문서에서 리스트로 전달한 단어들이 출현한 위치를 시각화. X축-문서시작 ~ 문서끝

plt.show()
FreqDist
- document에서 사용된 토큰(단어)의 사용빈도 데이터를 가지는 클래스
- 토큰(단어)를 key, 개수를 value로 가지는 딕셔너리 형태
- 생성
- Text 객체의 vocab() 메소드로 조회한다.
- 생성자(Initializer)에 토큰 List를 직접 넣어 생성가능
- 주요 메소드
- B(): 출연한 고유 단어의 개수
- [Apple, Apple] -> 1
- N(): 총 단어수
- [Apple, Apple] -> 2
- get(단어) 또는 FreqDist['단어'] : 특정 단어의 출연 빈도수
- freq(단어): 총 단어수 대비 특정단어의 출연비율
- most_common() : 빈도수 순서로 정렬하여 리스트로 반환
- B(): 출연한 고유 단어의 개수
FreqDist 사용 예시
# from nltk import FreqDist
# fd = FreqDist(news_word)
fd = news_text.vocab()
fd
wordcloud
- 문서내의 단어들의 빈도수를 시각화
- 많이 출현현 단어들을 크게, 적게 출현한 단어들은 작게 표현해서 핵심단어들을 쉽게 파악할 수 있도록 도와준다.
pip install wordcloud
import matplotlib.pyplot as plt
from wordcloud import WordCloud

font_path = 'C:/Windows/Fonts/malgun.ttf'
wc = WordCloud(
                font_path=font_path, #한글 폰트설정
                min_font_size = 1, #가장 적게 나온 단어의 폰트 크기
                max_font_size=40,  #가장 많이 나온 단어의 폰터 크기
                relative_scaling=0.2, # 폰트의 증가 비율 . 0 ~ 1
                background_color='white',
                prefer_horizontal=0.6,  #기본: 0.9
                max_words=100   #wordcloud에 나올 총 단어수 - 기본: 200
              )


with open('news.txt', encoding='utf-8') as f:
    txt = f.read()

txt[:300]


word_cloud = wc.generate_from_frequencies(fd)  #딕셔너리/FreqDist객체 - {단어:빈도수, 단어:빈도수}
plt.figure(figsize=(10,7))
plt.imshow(word_cloud, interpolation='bilinear')
plt.axis('off')
plt.show()

scikit-learn의 CountVectorizer를 이용해 TDM 만들기
- CF) https://ysyblog.tistory.com/95
- TDM
- Term-Document-Matrix
- 문서안에서 문서를 구성하는 단어들이 몇번 나왔는지를 표현하는 행렬
- 학습: fit(raw document)
- raw document - 문장을 원소로 가지는 1차원 배열형태 문서
- 전체 문장들(corpus)에서 고유단어들을 찾아낸뒤 index를 붙인다.
- 변환: transform(raw document)
- 문장별(원소) 단어 count
- CountVectorizer 주요 속성, 메소드
- cv.vocabulary_
- 단어-index 반환(딕셔너리)
- get_feature_names()
- index순서대로 단어들 반환
- cv.vocabulary_
countvectorizer 사용 예시
# 리스트의 원소 => document(문서)
documents = [
    'This is the first document. I write the document.',  #문서 1
    'Where are you living? I am living in Seoul'          #문서 2
]
from sklearn.feature_extraction.text import CountVectorizer #Transformer(변환기)
cv = CountVectorizer()
# 학습
cv.fit(documents)
# 변환
tdm_array = cv.transform(documents)
tdm_array.shape
tdm_array.toarray() #sparse matrix를 ndarray 변환
cv.vocabulary_
cv.get_feature_names()
데이터에 적용
- 위에서 만든 news_tokens 이용
news = [' '.join(sent_list) for sent_list in news_tokens]

cv_news = CountVectorizer()
cv_news.fit(news)
tdm_news = cv_news.transform(news)


news_tdm_df = pd.DataFrame(tdm_news.toarray(), columns = cv_news.get_feature_names())
news_tdm_df.head()
728x90
반응형
'Data Analysis & ML > Text Mining' 카테고리의 다른 글
| [Text Mining]Feature Vectorize(TF-IDF, TfidfVectorizer) (0) | 2020.09.15 |
|---|---|
| [Text Mining] Feature Vectorize (DTM/TDM, CountVectorizer) (0) | 2020.09.15 |
| [Text Mining] KoNLPy (한국어 텍스트 처리 패키지) (0) | 2020.09.13 |
| [Text Mining][NLP] NLTK 패키지를 사용한 Text 분석 (형태소, 어간,품사부착,원형복원) (0) | 2020.09.09 |
| [Text Mining][NLP] 자연어 처리를 위한 NLTK (설치 방법 및 사용 문법) (0) | 2020.09.09 |